What Is JSX in React and How Does It Work? A Comprehensive Guide

JSX, or JavaScript XML, is a syntax extension for JavaScript. It allows developers to write markup directly in their JavaScript code, making it easier to create UI components. JSX is widely used in React because it offers a simple and declarative way to describe what the UI should look like, ultimately making the development process more intuitive. For more details, refer to the React.js Documentation.
Using JSX in React applications means that you can write components that are more readable and maintainable, as the visual structure of the UI is evident from the code itself. This also makes JSX a powerful tool for developers working on complex UI elements.
What Does JSX Stand For?
JSX stands for JavaScript XML. It was created by Facebook as an intuitive extension to JavaScript, making it easier for developers to compose their UI with a syntax that looks similar to HTML. JSX compiles down to React.createElement() calls, bridging the gap between JavaScript logic and the desired user interface structure.
For instance, JSX makes it easy to define complex views with a structure that resembles HTML, but under the hood, JSX is transformed into efficient JavaScript calls.
How Does JSX Work?
JSX allows you to mix JavaScript and HTML-like tags, which get compiled into JavaScript that React can use to construct the virtual DOM. When using JSX, you can embed JavaScript expressions directly inside the markup by using curly braces {}.
Here’s a simple example of JSX syntax used in a React component:
import React from 'react';

const InfoBox = ({ message, id }) => {
  return (
    <div className="info" data-info-id={id}>
      <p className="info-message">
        <strong>{message}</strong>
        <em>🍔</em>
      </p>
    </div>
  );
};
In this example, JSX is used to describe the structure of the InfoBox component. The JSX syntax is then compiled by Babel to JavaScript calls, such as React.createElement(), which build the virtual DOM.
For comparison, the same component written without JSX would look like this:
import React from 'react';

const InfoBox = ({ message, id }) => {
  return React.createElement(
    "div",
    { className: "info", "data-info-id": id },
    React.createElement(
      "p",
      { className: "info-message" },
      React.createElement("strong", null, message),
      React.createElement("em", null, "🍔")
    )
  );
};Setting Up an Experiment with JSX in CKEditor 5

In CKEditor 5, the content is represented by a custom data model, which acts as an abstraction layer over the HTML data format. This abstraction facilitates advanced features like real-time collaboration and comments, but it can be challenging for developers new to CKEditor.
The goal of this experiment is to introduce a JSX-like syntax for model-to-view converters in CKEditor 5. This approach would simplify the process of defining converters, making them more readable and easier to work with. The setup involves using Babel with a custom plugin to transform JSX into calls compatible with CKEditor’s data model. You can learn more about the CKEditor 5 Editing Framework in our documentation.
Writing Markup with JSX in CKEditor 5
CKEditor 5 uses a virtual DOM to represent its content in the editor. Traditionally, model-to-view conversions in CKEditor 5 require defining converters using imperative API calls. For example, converting a model element to the view representation typically involves working with low-level writer methods, as seen below. For more details on CKEditor DowncastWriter, visit the DowncastWriter documentation.
editor.conversion.for('downcast').elementToElement({
  model: 'info',
  view: (modelElement, { writer }) => {
    const message = 'Some message';
    const id = modelElement.getAttribute('id');

    const element = writer.createContainerElement('div', { class: 'info', 'data-info-id': id });
    const p = writer.createContainerElement('p', { class: 'info-message' });
    writer.insert(writer.createPositionAt(element, 0), p);

    const strong = writer.createAttributeElement('strong');
    writer.insert(writer.createPositionAt(p, 0), strong);

    const messageText = writer.createText(message);
    writer.insert(writer.createPositionAt(strong, 0), messageText);

    const em = writer.createAttributeElement('em');
    writer.insert(writer.createPositionAt(p, 1), em);

    const hamburgerText = writer.createText('🍔');
    writer.insert(writer.createPositionAt(em, 0), hamburgerText);

    return element;
  }
});
With JSX, this process can be made more declarative:
const message = 'Some message';

editor.conversion.for('downcast').elementToElement({
  model: 'info',
  view: (modelElement, { writer }) => (
    <div className="info" data-info-id={modelElement.getAttribute('infoId')}>
      <p className="info-message">
        <strong>{message}</strong>
        <em>🍔</em>
      </p>
    </div>
  )
});
The JSX representation makes it easier to understand what the view structure will look like, reducing the cognitive load on developers and making code maintenance simpler.
Re-Purpose a JSX Transpiler for CKEditor 5
To enable JSX in CKEditor 5, we configured the @babel/plugin-transform-react-jsx plugin to work with CKEditor’s writer API. By defining a custom pragma that redirects JSX element creation to writer.createElementWithChildren(), you can use the @babel-plugin-transform-react-jsx effectively.
Here is an example Webpack configuration for JSX in CKEditor 5:
const ckxRule = {
  test: /\.ckx$/,
  use: [
    {
      loader: 'babel-loader',
      options: {
        plugins: [
          '@babel/plugin-syntax-jsx',
          [
            '@babel/plugin-transform-react-jsx',
            {
              runtime: 'classic',
              pragma: 'writer.createElementWithChildren',
              pragmaFrag: '"DocumentFragment"',
              throwIfNamespace: false
            }
          ]
        ]
      }
    }
  ]
};
Alternatively you can use Vite to do this. With the shift towards more modern and efficient build tools, Vite has become the de facto standard for many projects. Below is an example of how to achieve the same configuration using Vite, offering a simpler and faster setup process:
import { defineConfig } from 'vite';
import babel from '@rollup/plugin-babel';

export default defineConfig({
  plugins: [
    babel({
      plugins: [
        '@babel/plugin-syntax-jsx',
        [
          '@babel/plugin-transform-react-jsx',
          {
            runtime: 'classic',
            pragma: 'writer.createElementWithChildren',
            pragmaFrag: 'DocumentFragment',
            throwIfNamespace: false
          }
        ]
      ]
    })
  ]
});
This configuration leverages @rollup/plugin-babel for JSX transpilation, providing a streamlined and modern alternative to Webpack for CKEditor 5 projects.
Additionally, we extended the CKXWriter class to handle JSX-like element creation. For more details about CKEditor AttributeElement, refer to the AttributeElement API:
import { DowncastWriter } from 'ckeditor5';

export default class CKXWriter extends DowncastWriter {
  createElementWithChildren(name, attributes, ...children) {
    const parent = this.createContainerElement(name, attributes);

    for (const child of children) {
      const appendPosition = this.createPositionAt(parent, 'end');

      if (typeof child === 'string') {
        this.insert(appendPosition, this.createText(child));
      } else {
        this.insert(appendPosition, child);
      }
    }

    return parent;
  }
}Advantages of Using JSX in CKEditor 5
Using JSX to define downcast converters in CKEditor 5 provides several key benefits:
- Improved Readability: The declarative syntax makes it easier to understand the relationship between model elements and their view representations.
- Less Boilerplate: Writing markup using JSX eliminates repetitive use of the
writerAPI. - Maintainability: JSX simplifies the process of updating or expanding existing converters, making them more maintainable in the long run.
- Developer Familiarity: Developers who have experience with React can easily adapt to using JSX within CKEditor, leveraging their existing knowledge to work more efficiently.
Common Pitfalls and How to Avoid Them
When using JSX with CKEditor 5, developers might face issues with understanding how JSX elements map to CKEditor view elements. To avoid common pitfalls:
- Make sure to properly configure Babel and the @babel/plugin-transform-react-jsx plugin to match CKEditor’s requirements.
- Remember that CKEditor’s view elements, such as AttributeElement, need to be handled differently from container elements.
- Always test the output thoroughly to ensure that the generated views match the expected structure, especially when dealing with nested elements or custom attributes.
Insights from Using JSX in CKEditor 5
The experiment of using JSX for downcast conversion in CKEditor 5 shows promising results. It reduces the complexity of defining view elements and allows developers to use a syntax they are already comfortable with if they have experience with React. This approach has the potential to significantly simplify CKEditor customizations.
Moreover, using a more declarative syntax through JSX reduces the onboarding time for new developers familiar with React, making CKEditor more accessible to a broader audience.
Wrap-Up
Developing a proof-of-concept for JSX transpilation in CKEditor 5 was efficient, thanks to the comprehensive documentation provided by Babel and React. This allowed us to implement a working solution in a relatively short amount of time, showcasing the advantages of using JSX in complex editor environments.
Moving forward, we aim to adopt more declarative downcast converters as a standard approach in CKEditor 5 development. These converters help simplify the process by reducing boilerplate code and allowing for an HTML-like syntax that enhances both readability and maintainability.
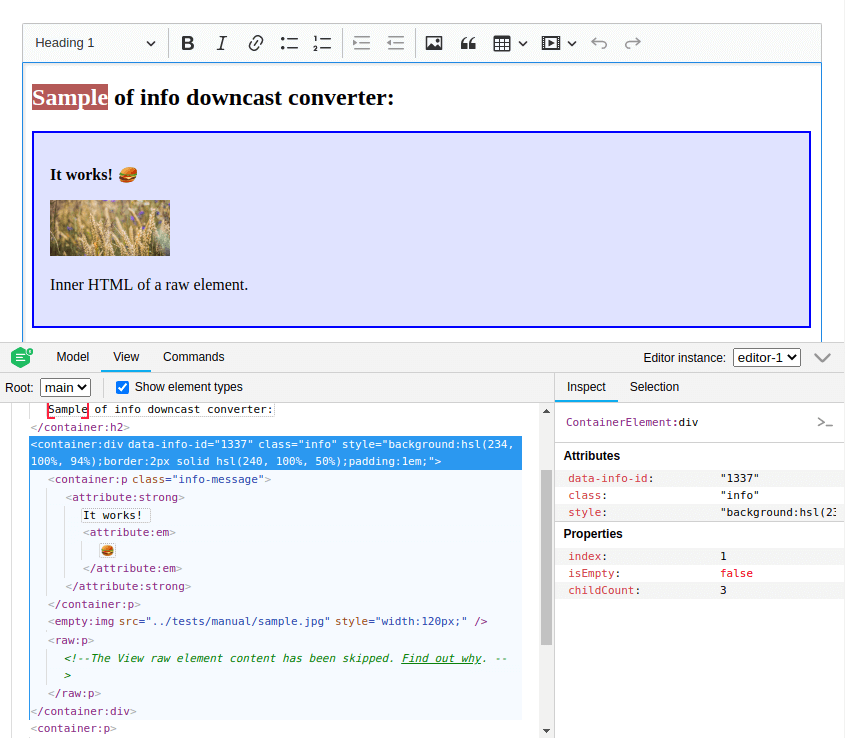
If you’re interested in exploring how other frameworks handle the virtual DOM, check out the Vue.js Render Function documentation. Additionally, tools like the CKEditor 5 Inspector are invaluable for debugging and inspecting view elements, making it easier to understand and refine your implementations.
Curious about how JSX can improve your editing experience? Give it a try with CKEditor 5 today!
For more information or to join the discussion, visit our GitHub page. You can also explore related topics such as How to detect human faces in JavaScript and Single-file Web Components.
This post was originally published on


