How to Build a Google Docs Clone with CKEditor 5 and Vue.js

Creating a Google Docs clone is a complex challenge. An editor must support basic text editing features and multiple advanced features. Additionally, for such editors to be useful, they should provide collaboration capabilities like editing the same document by multiple users or having the ability to leave comments.
CKEditor simplifies the process of creating a Google Docs clone by providing a modular architecture, real-time collaboration tools, and powerful customization options. This guide walks you through creating a Google Docs clone with Vue.js.
Installation and Setup
We will use the CKEditor Builder to get started.
The Builder provides a visual approach for creating the initial project, which gets you to the point of having a codebase with a preconfigured CKEditor.
Selecting the Right CKEditor Build
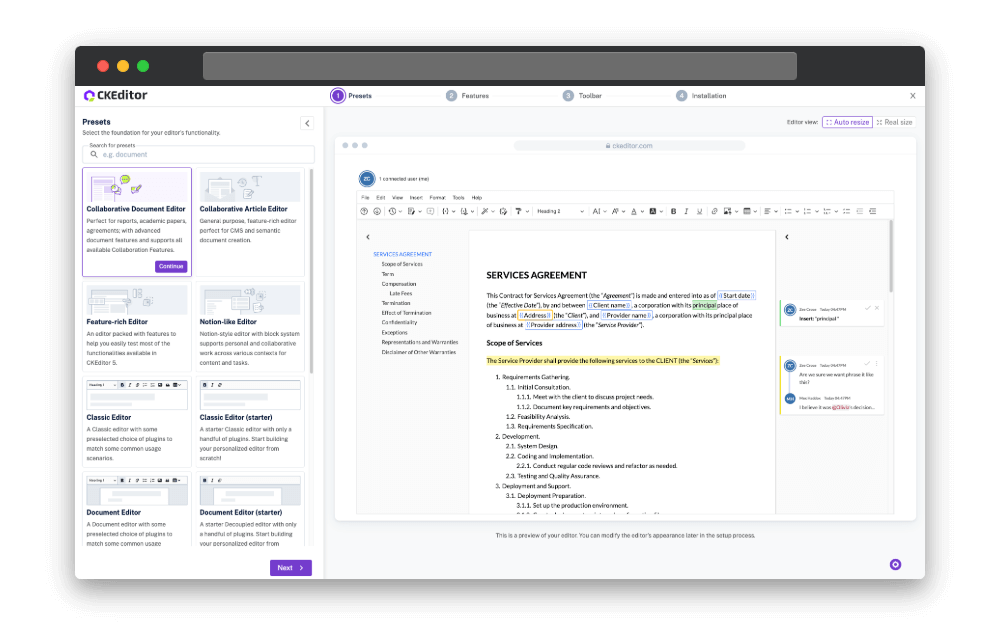
In the first step, Builder offers various presets that are the foundation for the editor’s functionality. The Collaborative Document Editor is the closest option for the Google Docs clone project we are building.
When this preset is selected, the editor will appear on the Builder’s right panel. In Builder, the editor is interactive and allows you to evaluate the features that were enabled automatically with the preset.
In the next step, you can manually include additional features. Since the Collaborative Document Editor is already packed with all the necessary features, we can skip this step and press Next.
The third step allows you to customize the functionality of the Toolbar. The Toolbar is already preconfigured with our preset, so you can review the selected options and proceed to the next step.
As for the final step, we need to perform the following actions:
- Select the language - You can pick the editor’s language from the dropdown. By default, English is selected.
- Sign up for a trial - Since our Collaborative Document editor preset includes premium features, you need to sign up for a 14-day free trial of CKEditor. After creating an account, your license key will be automatically populated in the Builder’s starter project we are creating.
- Select the setup - For this last step, you should select the technology you’ll use. In our case we’ll choose Vue, and Cloud (CDN) as the integration method. Finally, you can download a Vue.js application with the CKEditor component by selecting the Download project option for the output.
Core Features for a Google Docs Clone
Now that we have our project, let’s review the generated code to understand how CKEditor works and how to customize the starter project.
At the top of the App.vue file, we can see the template that includes some markup and the ckeditor component as the lowest node:
<template>
...
<ckeditor v-if="editor && config" :modelValue="config.initialData" :editor="editor" :config="config" @ready="onReady" />
</template>
The editor configuration is located below. An important detail can be found in the <script> wrapper, which has a setup attribute. That indicates that the CKEditor Vue.js starter uses Composition API. It comes with Reactivity API, Lifecycle Hooks, and Dependency injection. To find out more about the composition API, navigate to the Vue.js documentation.
Now, let’s cover the code related to the editor’s configuration. We will divide the code into three logical groups:
- Packages imports and setup variables
- Imports of the plugins
- Editor’s configuration - which includes Toolbar and plugin configurations
Packages Imports and Setup Variables
First, we have the Vue.js imports that are necessary for the integration of the editor into the application and CKEditor-related imports that allow us to generate the editor instance and import plugins:
import { computed, ref, onMounted, watchEffect, useTemplateRef } from 'vue';
import { Ckeditor, useCKEditorCloud } from '@ckeditor/ckeditor5-vue';
Below are several CKEditor-related variables that are required for the features that come with the Collaborative Document Editor preset that we used during the Builder phase:
LICENSE_KEYAI_API_KEYDOCUMENT_IDCLOUD_SERVICES_TOKEN_URLCLOUD_SERVICES_WEBSOCKET_URL
All of these variables are already pre-filled by the Builder except for the AI_API_KEY since it’s outside of the Builder’s scope and can be found in your AI service provider account. If you want to use the CKEditor AI Assistant, find out which LLM providers CKEditor supports by reading the AI Assistant Integration documentation.
Import of the plugins
The next logical group we will cover is the code related to importing the CKEditor plugins. First, we have the cloud variable, which we use to import the plugins with the useCKEditorCloud hook we mentioned above:
const cloud = useCKEditorCloud({ version: '44.3.0', premium: true, ckbox: { version: '2.6.1' } });That implementation is related to the Cloud (CDN) integration method we used in the Builder and will differ from the self-hosted method.
Below that, the objects with imported plugins are located. There are two separate objects for free and premium features:
const {
  Plugin,
  ButtonView,
  Alignment,
  Autoformat,
  AutoImage,
  AutoLink,
  ...
} = cloud.data.value.CKEditor;

const {
  AIAssistant,
  CaseChange,
  Comments,
  DocumentOutline,
  ExportPdf,
  ...
} = cloud.data.value.CKEditorPremiumFeatures;Editor’s Configuration
And finally, we will cover the editor’s configuration.
First, we have the toolbar configuration, which is an array of strings that allow us to include plugins in the Toolbar, specify the order, and group features using the straight-line separator:
toolbar: {
  items: [
    'previousPage',
    'nextPage',
    '|',
    'revisionHistory',
    'trackChanges',
    'comment',
    '|',
    'insertMergeField',
    'previewMergeFields',
    '|',
    'aiCommands',
    'aiAssistant',
    '|',
    ...
  ],
  shouldNotGroupWhenFull: false
},
Next, we have the plugins array. Here we list and register both free and premium plugins we imported using the cloud variable previously:
plugins: [
  AIAssistant,
  Alignment,
  Autoformat,
  AutoImage,
  AutoLink,
  Autosave,
  BalloonToolbar,
  Bold,
  ...
],
Below that, we have separate configurations for plugins. While some CKEditor plugins provide default behavior or don’t require configuration at all, other plugins can be controlled using the configuration options like in the example below:
pagination: {
  pageWidth: '21cm',
  pageHeight: '29.7cm',
  pageMargins: {
    top: '20mm',
    bottom: '20mm',
    right: '12mm',
    left: '12mm'
  }
},
To find out what is possible for each plugin, navigate to the Features documentation.
With a better understanding of how the CKEditor component works, let’s review specific features in our setup that make our editor a complete Google Docs clone.
Basic Editing and Formatting Tools
First, a Google Docs-like editor must support essential text editing features. Our editor already includes essential functionality with the preset we selected with the Builder.
Text Formatting
CKEditor provides text styling options such as bold, italic, underline, and headings.
For basic text styles, no configuration is needed. It is only required for plugins to be added to the toolbar items to be visible and to the plugins array to function:
toolbar: {
  items: [
    ...,
    '|',
    'heading',
    '|',
    'bold',
    'italic',
    'underline'
    '|',
    ...
  ]
}

plugins = [
  Bold,
  Italic,
  Underline,
  Heading,
  ...
]
However, the supported heading types can be configured for the Headings plugins. Builder generated the code that supports paragraphs and headings up to h6, but the supporting list can be configured to your liking:
heading: {
  options: [
    {
      model: 'paragraph',
      title: 'Paragraph',
      class: 'ck-heading_paragraph'
    },
    {
      model: 'heading1',
      view: 'h1',
      title: 'Heading 1',
      class: 'ck-heading_heading1'
    },
    {
      model: 'heading2',
      view: 'h2',
      title: 'Heading 2',
      class: 'ck-heading_heading2'
    },
    {
      model: 'heading3',
      view: 'h3',
      title: 'Heading 3',
      class: 'ck-heading_heading3'
    },
    {
      model: 'heading4',
      view: 'h4',
      title: 'Heading 4',
      class: 'ck-heading_heading4'
    },
    {
      model: 'heading5',
      view: 'h5',
      title: 'Heading 5',
      class: 'ck-heading_heading5'
    },
    {
      model: 'heading6',
      view: 'h6',
      title: 'Heading 6',
      class: 'ck-heading_heading6'
    }
  ]
},
With this code in place, the editor supports basic text styling, which is essential for the Google Docs clone.
Lists and Tables
Now, let’s cover some additional essential features. CKEditor allows users to create several types of lists and tables.
Similar to the basic text styling, plugins should be included in the toolbar and plugins arrays:
toolbar: {
  items: [
    'insertTable',
    '|',
    'bulletedList',
    'numberedList',
    'multiLevelList',
    'todoList',
    ...
  ]
}

plugins = [
  MultiLevelList,
  List,
  TodoList,
  TableToolbar,
  Table,
  TableCaption,
  TableCellProperties,
  TableColumnResize,
  ...
]
The list of plugins related to tables has multiple items, with only one item in the Toolbar. That is because the Table plugin allows you to include additional plugins that make working with tables very intuitive.
Additionally, the table contextual Toolbar can be configured. With the code that we have from the Builder, it is already configured and can be modified or kept as is:
table: {
  contentToolbar: ['tableColumn', 'tableRow', 'mergeTableCells', 'tableProperties', 'tableCellProperties']
},
To find out more about everything that is available with the Table plugin, table feature documentation provides a detailed explanation.
Advanced Editing: Templates & Merge Fields
Now, we are ready to explore more advanced features that wil make our setup powerful. One such feature is Templates. It allows the insertion of predefined content structures.
Creating a Template
In CKEditor, templates are presented as HTML structures. This feature comes preconfigured with the Builder and has the following properties that can be specified for each template:
title- The title of the template that will be visible when viewing the list of available templates.data- The HTML structure that represents the template itself.description- A more detailed explanation of the template.icon- An optional property that accepts SVG code and helps differentiate multiple templates.
To provide an example of a template, we can create a meeting notes template:
template: {
  definitions: [
    {
      title: "Meeting Notes",
      description: "A structured template for capturing meeting discussions, decisions, and action items",
      data: `
        <h1 style="text-align:center;">
          Meeting Notes
        </h1>
        <figure class="table" style="width:100%;">
          <table style="border-style:none;">
            <thead>
              <tr>
                <th style="border-style:none;">
                  Meeting Details
                </th>
              </tr>
            </thead>
            <tbody>
              <tr>
                <td style="border-style:none;">
                  <p>
                    <strong>Date:</strong> 2025-02-14
                  </p>
                  <p>
                    <strong>Time:</strong> 10:00 AM - 11:30 AM
                  </p>
                  <p>
                    <strong>Attendees:</strong> John Doe
                  </p>
                </td>
              </tr>
            </tbody>
          </table>
        </figure>
        <h2>Agenda</h2>
        <figure class="table" style="width:100%;">
          <table>
            <thead>
              <tr>
                <th>Item</th>
                <th>Description</th>
                <th>Presenter</th>
              </tr>
            </thead>
            <tbody>
              <tr>
                <td></td>
                <td></td>
                <td></td>
              </tr>
            </tbody>
          </table>
        </figure>
        <h2>Meeting Notes</h2>
        <p> </p>
        <h2>Decisions Made</h2>
        <p> </p>
        <h2>Action Items</h2>
        <figure class="table" style="width:100%;">
          <table>
            <thead>
              <tr>
                <th>Task</th>
                <th>Owner</th>
                <th>Due Date</th>
              </tr>
            </thead>
            <tbody>
              <tr>
                <td></td>
                <td></td>
                <td></td>
              </tr>
            </tbody>
          </table>
        </figure>
      `
    }
  ]
}
Inline styles can be used within template data. We can now insert the meeting notes template in our editor.

Using Merge Fields
Templates are even more useful when used with another plugin called Merge fields. This plugin also comes preconfigured by the Builder.
Merge fields is a feature that allows visually distinguishing specific parts of content intended for automated insertion. Default values can be specified, which is particularly useful for repetitive data. Let’s create Merge fields that we will use in our meeting notes template:
mergeFields: {
  definitions:
  [
    {
      id: 'myName',
      label: 'My Name',
      defaultValue: 'John Doe'
    },
    {
      id: 'meetingDate',
      label: 'Meeting Date',
      defaultValue: '2025-02-14'
    },
  ],
},
Merge fields can be incorporated into templates by using double curly brackets ({{ }}) with the id property of the merge field, for example, {{meetingDate}}. Let’s update our template:
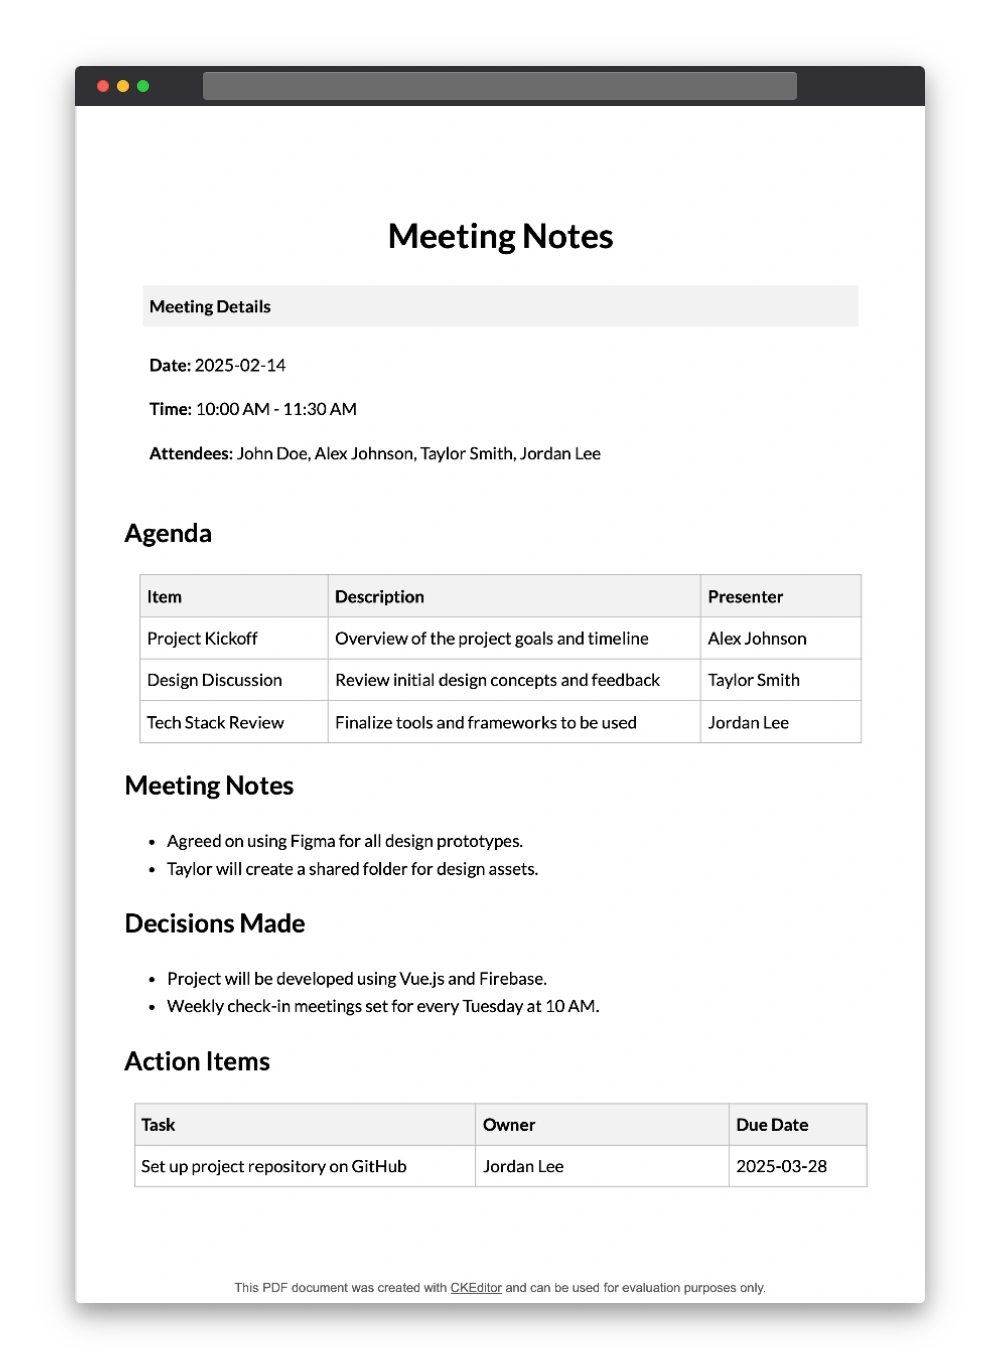
Now, when inserting the template in the editor, it not only has static text but also uses Merge fields, and we can replace the placeholder label with the default value that was specified earlier in the code.
template: {
  definitions: [
    {
      title: "Meeting Notes",
      description: "A structured template for capturing meeting discussions, decisions, and action items",
      data: `
        <h1 style="text-align:center;">
          Meeting Notes
        </h1>
        <figure class="table" style="width:100%;">
          <table style="border-style:none;">
            <thead>
              <tr>
                <th style="border-style:none;">
                  Meeting Details
                </th>
              </tr>
            </thead>
            <tbody>
              <tr>
                <td style="border-style:none;">
                  <p>
                    <strong>Date:</strong> {{meetingDate}}
                  </p>
                  <p>
                    <strong>Time:</strong> 10:00 AM - 11:30 AM
                  </p>
                  <p>
                    <strong>Attendees:</strong> {{myName}}
                  </p>
                </td>
              </tr>
            </tbody>
          </table>
        </figure>
        <h2>Agenda</h2>
        <figure class="table" style="width:100%;">
          <table>
            <thead>
              <tr>
                <th>Item</th>
                <th>Description</th>
                <th>Presenter</th>
              </tr>
            </thead>
            <tbody>
              <tr>
                <td></td>
                <td></td>
                <td></td>
              </tr>
            </tbody>
          </table>
        </figure>
        <h2>Meeting Notes</h2>
        <p> </p>
        <h2>Decisions Made</h2>
        <p> </p>
        <h2>Action Items</h2>
        <figure class="table" style="width:100%;">
          <table>
            <thead>
              <tr>
                <th>Task</th>
                <th>Owner</th>
                <th>Due Date</th>
              </tr>
            </thead>
            <tbody>
              <tr>
                <td></td>
                <td></td>
                <td></td>
              </tr>
            </tbody>
          </table>
        </figure>
      `
    }
  ]
}Collaboration Features
Real-Time Collaboration Setup
Now that we have covered various features of our Google Docs clone, we are ready to cover one of the features that makes our editor truly powerful: Real-time collaboration.
With CKEditor, you can edit documents collaboratively, leave comments, track changes, and see the revision history.
With the Cloud setup we created when using the Builder, implementing the Real-time collaboration feature is just as easy as basic text editing functionality.
We should mention the important variable that was pre-filled by the Builder when you signed up for a trial license - CLOUD_SERVICES_TOKEN_URL. In our case, this variable is a development token URL that allows us to try out real-time collaboration in minutes.
First, corresponding plugins should be imported using the cloud variable and initialized in the editor:
plugins = [
  RealTimeCollaborativeComments,
  RealTimeCollaborativeEditing,
  RealTimeCollaborativeRevisionHistory,
  RealTimeCollaborativeTrackChanges,
  RevisionHistory,
  ...
]
As the second step, the token URL should be included in the configuration of cloudServices:
cloudServices: {
  tokenUrl: CLOUD_SERVICES_TOKEN_URL,
},
With that setup, we are able to test features related to Real-time collaboration in our development environment.

It’s important to mention that Real-time collaboration can be used with both Cloud Services and the on-premise CKEditor setup.
For production-ready applications, some extra coding is required. To find out more about Real-time collaboration, refer to the following documentation:
Export Content to Word or PDF
Content exporting is another feature that makes our Google Docs clone really powerful. This feature comes with two options:
- Export to PDF
- Export to Word
Both options are pre-enabled by the Builder and don’t require manual adjustments to get started. We will explore the Export to PDF configuration to familiarize ourselves with this feature. With this plugin, the following things can be configured and customized:
- Styles of the exported content - this is one of the most important aspects of the content exporting feature. By using the same stylesheets that define the editor’s appearance, the exported document matches what you can see in the editor.
- Name of the saved file
- Document format - here, we can specify things like format, page margins, and page orientation
exportPdf: {
  stylesheets: [
    /* This path should point to the content stylesheets on your assets server. */
    /* See: https://ckeditor.com/docs/ckeditor5/latest/features/converters/export-pdf.html */
    './export-style.css',
    /* Export PDF needs access to stylesheets that style the content. */
    'https://cdn.ckeditor.com/ckeditor5/44.3.0/ckeditor5.css',
    'https://cdn.ckeditor.com/ckeditor5-premium-features/44.3.0/ckedi tor5-premium-features.css'
  ],
  fileName: 'export-pdf-demo.pdf',
  converterOptions: {
    format: 'A4',
    margin_top: '20mm',
    margin_bottom: '20mm',
    margin_right: '12mm',
    margin_left: '12mm',
    page_orientation: 'portrait'
  }
},
The configuration can be extended with various options. To find out what the Export to PDF feature supports, refer to the Export to PDF documentation.
With the default configuration, pressing the File and Export to PDF options in the toolbar will save the file locally with the same styling of the content the user has in the editor.
Manual Plugin Implementation and Customization
After reviewing what can be achieved with the Builder, the next logical aspect to cover will be the extensibility.
Importing Plugins
Even though we completed the setup and enabled features with the Builder, we are not limited to what was selected initially. CKEditor’s modular architecture allows you to add or remove features easily.
For demonstration, let’s add a Code block plugin. First, we need to import the plugin:
const {
  CodeBlock,
  ...
} = cloud.data.value.CKEditorAdding Plugins to the Toolbar
Next, the plugin should be included in the Toolbar and listed in the plugins array:
toolbar: {
  items: [
    ...,
    '|',
    'codeBlock'
  ]
}
plugins: [
  ...,
  CodeBlock
]Customizing Plugin Behavior
Finally, we need to add the configuration where we specify the supported languages by specifying language and label values:
codeBlock: {
  languages: [
    { language: 'plaintext', label: 'Plain text' },
    { language: 'javascript', label: 'JavaScript' },
    { language: 'typescript', label: 'TypeScript' },
    { language: 'css', label: 'CSS' },
    { language: 'diff', label: 'Diff' }
  ]
},
We specified plaintext as the first option, replicating the Google Docs behavior. Unless the language is selected when pressing the plugin icon in the Toolbar, newly created code blocks are generated as Plain text by default.
Code blocks plugin can be extended even further with code highlighters like highlight.js. More information about the Code block plugin can be found in the Code blocks documentation.
To find the plugin toolbar button name, refer to the CKEditor documentation. Each plugin’s guide lists its name, toolbar button name, and available configuration options.
Conclusion
By using the CKEditor Builder, we were able to build a Google Docs clone with Vue.js successfully.
We explored the basic and advanced text editing features available with CKEditor. Additionally, we covered important features that come with the Collaborative Document Editor preset, like:
- Real-time collaboration
- Templates and Merge fields
- Content export
As the last step, we saw that CKEditor provides a flexible and scalable solution that can be extended with additional features easily.
Helpful Links
To explore deeper the features covered in this article, check out the official documentation:
Get started today! Register for a free trial and create an editor that fits your needs perfectly!