How to Create a Rich Text Editor in Angular: Step-by-Step

CKEditor 5 is a powerful rich text editor that can be easily integrated into Angular applications. Whether you’re building a CMS, a documentation tool, or any other application requiring a robust text editing experience, CKEditor offers a customizable and feature-rich solution.
This article is an introduction for using CKEditor with Angular, which includes:
-
The setup process using the CKEditor Builder
-
Configuration of key properties
-
How to handle data efficiently
-
Directions to customize the editor’s look and feel
By the end of this article, you’ll know how to use CKEditor within an Angular application and optimize it for your needs.
Setting up CKEditor with Builder
We will use the CKEditor Builder to generate a custom build with CKEditor already integrated into the Angular setup.
Start by navigating to the CKEditor Builder. We need to complete four steps to get to the point where we have a functional, preconfigured starter project:
Selecting the preset - pick Feature-rich Editor preset to get an instance with useful features that are already preselected for you.
Selecting features - since we picked a preset that is already packed with multiple plugins, we can skip this step and press the Next button at the bottom of the list of features.
Customizing the toolbar - same as with features, with the Feature-rich preset, Menu Bar is enabled as one of the possible customizations of the toolbar.
Installing - at this last step, you need to select Angular as the technology, Cloud (CDN) as an integration method, and Download project as the output option. Additionally, you must sign up for a trial license key to use the Feature-rich preset since it includes some premium features, which you can find listed on the Builder's left panel.
Configuration
Once the project is downloaded, the dependencies are the only missing part. These can be installed by running npm install in the project’s folder in your terminal.
Everything else is already generated and preconfigured by the Builder, including:
-
Minimal Angular setup with essential Angular-related dependencies.
-
CKEditor component that is located in the
app.component.tsfile with the corresponding template and stylesheet.
Let’s quickly cover the structure of the CKEditor component.
At the top of the component, we have variables associated with your CKEditor account and trial license:
-
LICENSE_KEY -
CLOUD_SERVICES_TOKEN_URL
The list of variables may vary depending on the selected preset and features chosen in the first two steps of the CKEditor Builder usage.
Next, we have a cloudConfig object that specifies the version of CKEditor and a boolean property that allows you to use premium features:
const cloudConfig = {
	version: '44.3.0',
	ckbox: {
		version: '2.6.1'
	},
	premium: true
} satisfies CKEditorCloudConfig;
Next, inside the component, using the ngOnInit hook and loadCKEditorCloud helper, the editor is loaded in your application:
public ngOnInit(): void {
	loadCKEditorCloud(cloudConfig).then(this._setupEditor.bind(this));
}
After that, we have code related to the editor configuration that includes:
-
Objects with imported plugins -
cloud.CKEditorandcloud.CKEditorPremiumFeaturesare used to import both free and premium plugins. -
Type of editor, which is Classic editor in our case -
this.Editor = ClassicEditor. -
Toolbar configuration - an
itemsarray with string values associated with plugins that we enabled with the Feature-rich preset and straight-line separators for logical grouping. -
Array of plugins - here, the plugins are injected into your editor, which we first imported using the
cloudvariable. -
Finally, configurations for specific plugins.
CKEditor Builder generated all that to provide a fully functional editor with multiple features enabled at the starting point.
Configuring CKEditor (@Input properties)
The CKEditor Angular component provides additional methods of customizing the component’s behavior, not only the plugin’s configurations. That includes several @Input properties. Let’s cover a couple of properties to understand what is available and how to use those.
editor and config Properties
These two properties define the editor build being used and its configuration, including the toolbar and plugin configurations we reviewed briefly when checking the Builder’s generated code. editor is a required property that creates an editor instance, and the config property passes the configuration.
Both of these properties can be located in the component’s template:
<!-- app.component.html -->

<div #editorElement>
	<ckeditor
		[editor]="Editor"
		[config]="config"
		*ngIf="Editor && config"
	/>
</div>
Inside the app.component.ts, we can locate the properties that are declared and used in the template:
public Editor: typeof ClassicEditor | null = null;
public config: EditorConfig | null = null;disabled
Next, let’s cover an additional property available with the CKEditor component, which is disabled. As the name of the property implies, it controls the editor’s state and can enable the read-only mode.
In the app.component.ts, the following changes are needed to implement it:
-
Creation of the boolean variable that controls the state of the property.
-
Function that changes the variable’s state.
public isDisabled!: boolean;

toggleDisabled() {
    this.isDisabled = !this.isDisabled
}
Now, in the template of the component, we need to:
- Add the property and pass the
isDisabledboolean property.
Create a button that modifies the state of the property with the toggleDisabled function as a (click) value.
<div class="main-container">
	<div class="editor-container editor-container_classic-editor editor-container_include-style" #editorContainerElement>
		<div class="editor-container__editor">
			<div #editorElement>
				<ckeditor
					[editor]="Editor"
					[config]="config"
					[disabled]="isDisabled"
					*ngIf="Editor && config"
				/>
			</div>
		</div>
	</div>
	<div class="button-container">
		<button class="button" (click)="toggleDisabled()">
			{{ isDisabled ? 'Enable editor' : 'Disable editor' }}
		</button>
	</div>
</div>
Now if we press the button the editor will become read-only. We can no longer type inside the editor, and buttons in the toolbar are grayed-out, which indicates that those are disabled as well.
Handling Events (@Output properties)
We’ve covered some of the @Input properties. Now let’s review some of the @Output properties that allow you to handle events and perform actions based on the event.
ready Property
The first property we will implement is ready. For this demonstration, we will show the Loading editor... text until the editor is loaded, and once loaded, the editor will be the focus.
Keep in mind that some alternative editor builds may already have an onReady function declared by default.
For example, CKEditor provides different editor types, and if you choose the Document Editor preset in the Builder (which uses the Decoupled Editor), the onReady function is predefined to handle toolbar modifications.
In this case, instead of defining a new function, the steps mentioned below should be implemented within the predefined function to avoid conflicts.
First, in the app.component.ts, we need to add the following code:
-
Boolean property that will change the visibility of the
Loading editor...line -
onReady()function that:Changes the state of the property.
Focuses the editor.
Logs the confirmation that the editor is ready and focused.
public isEditorLoading = true;

onReady(editor: ClassicEditor) {
	setTimeout(() => { // Since the CKEditor instance initializes quickly, setTimeout is used to deliberately slow it down and make the loading phase more noticeable
		this.isEditorLoading = false;
		editor.editing.view.focus() ;
		console.log('Editor is ready and focused');
}, 200)
}
Now, in the template of the component, we can add the line and pass the property to the conditionally rendered line:
<div class="main-container">
	<div *ngIf="isEditorLoading">
	Loading editor...
	</div>
	<div class="editor-container editor-container_classic-editor editor-container_include-style" #editorContainerElement>
		<div class="editor-container__editor">
			<div #editorElement>
				<ckeditor
					[editor]="Editor"
					[config]="config"
					[disabled]="isDisabled"
					(ready)="onReady($event)"
					*ngIf="Editor && config"
				/>
			</div>
		</div>
	</div>
	<div class="button-container">
		<button class="button" (click)="toggleDisabled()">
			{{ isDisabled ? 'Enable editor' : 'Disable editor' }}
		</button>
	</div>
</div>
At this point the expected behavior in the browser should be:
While the editor is loading, the
Loading editor...line is visible.Once the editor is loaded, the line is removed.
The editor is in focus, and in the console we can see the Editor is ready and focused log.
blur and focus Properties
Let’s extend our functionality by implementing the blur and focus properties. For this simple demonstration, we will do the following:
Create an
onFocus()function that will log the fact of the editor being focused.
Create an onBlur() function to log a similar message that the editor lost focus.
onFocus(): void {
	console.log('Editor is focused');
}

onBlur(): void {
	console.log('Editor lost focus');
}
In the template, we must include properties for the editor component:
<div #editorElement>
	<ckeditor
		*ngIf="Editor && config"
		[editor]="Editor"
		[config]="config"
		[disabled]="isDisabled"
		(ready)="onReady($event)"
		(focus)="onFocus()"
		(blur)="onBlur()"
	/>
</div>
Handling Data
Next, let’s cover the important topic of how to handle data. CKEditor provides a straightforward way to retrieve data.
Saving Data in CKEditor
To retrieve the content, we can use the change event and call the getData() function. Additionally, update the imports from the @ckeditor/ckeditor5-angular package to include the ChangeEvent type:
import { ..., ChangeEvent } from '@ckeditor/ckeditor5-angular'

onChange({ editor }: ChangeEvent) {
  console.log('Editor content updated:', editor.getData());
}
And in the template, we must declare the change event in the editor component:
<div #editorElement>
	<ckeditor
		*ngIf="Editor && config"
		[editor]="Editor"
		[config]="config"
		[disabled]="isDisabled"
		(ready)="onReady($event)"
		(focus)="onFocus()"
		(blur)="onBlur()"
		(change)="onChange($event)"
	/>
</div>
Every time the content inside the editor changes, the latest version will be logged into the console.
Performance Optimization: Disabling Two-Way Data Binding
For performance reasons, it’s best to avoid calling getData() on every keystroke, especially when working with large documents.
By default, two-way data binding causes updates whenever the editor changes. Instead of binding the content directly, it’s better to retrieve it only when needed.
We can disable two-way data binding with the CKEditor component. First, we need to create a boolean property and set it to true:
public isTwoWayDataBindingDisabled = true;By attaching this boolean property to the template of the component, we will achieve the desired behavior - changes won’t be registered on each keystroke even if we keep the onChange as implemented previously.
<div #editorElement>
	<ckeditor
		[editor]="Editor"
		[config]="config"
		*ngIf="Editor && config"
		(change)="onChange($event)"
		[disabled]="isDisabled"
		(ready)="onReady($event)"
		(focus)="onFocus()"
		(blur)="onBlur()"
		[disableTwoWayDataBinding]="isTwoWayDataBindingDisabled"
	/>
</div>
However, instead of creating custom functionality that allows retrieving content for saving, CKEditor provides the Autosave plugin that automatically saves changes at defined intervals. This is a recommended approach for production-ready applications.
To enable the Autosave plugin to automatically save content after a short period of inactivity, first, we need to import the Editor type:
import type { ..., Editor } from '<https://cdn.ckeditor.com/typings/ckeditor5.d.ts>';Next, inside the config object, where configurations for plugins are located, add the one for the autosave plugin. In the example below, the save function will be triggered after 1000ms and log the saved content in the console:
autosave: {
	waitingTime: 1000,
	save: async ( editor: Editor ) => {
		console.log('Editor content updated:', editor.getData());
	}
},
Editor Customization
It is not only the logic that can be customized with CKEditor. Additionally, visual appearance can be customized to match your application’s branding.
Customizing the Theme
Customizing the theme can be achieved by overriding the default values for CSS variables available with CKEditor. Alternatively, the look and feel of the editor can be modified by setting styles for specific class names.
In the code sample below, the border radius is customized for the editor and menu bar specifically:
/* app.component.css */

:root {
    --ck-border-radius: 10px;
}

.ck.ck-editor__top .ck-sticky-panel .ck-sticky-panel__content .ck-menu-bar {
	border-radius: 10px;
}
Customizing Content Styles
Not only is the editor customizable with CKEditor, but the content inside of it is as well. In this example, the heading element inside the editor is modified:
/* app.component.css */

.ck-content h2 {
    color: #0056b3;
    font-family: 'Arial', sans-serif;
    border-bottom: 2px solid #0056b3;
    padding-bottom: 5px;
}
After implementing the changes provided above, you can see the stylistically updated editor in the browser.
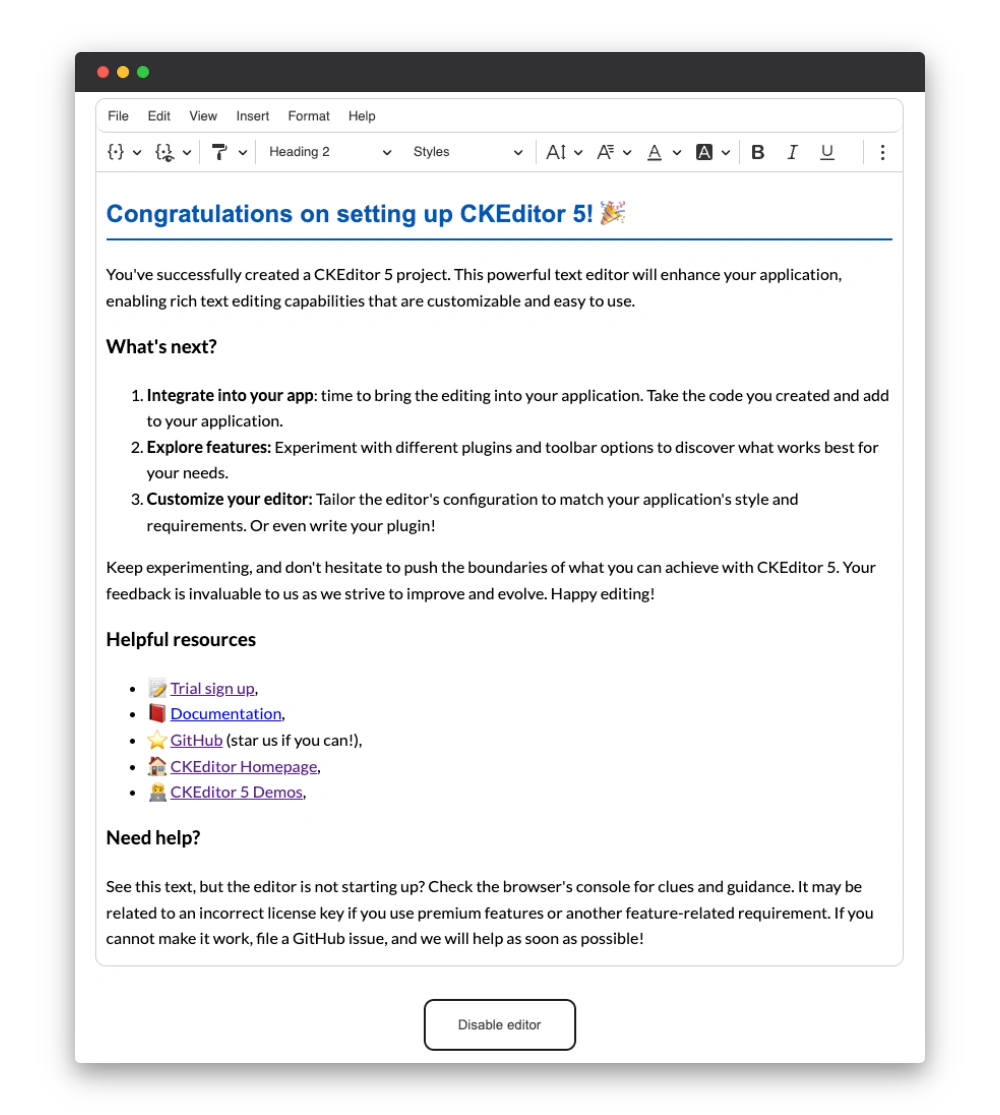
To learn more about styling customization and details like color sheets or available CSS variables, read the respective documentation segment.
Conclusion
In this article, we’ve explored how to create a project with a rich-text editor using Angular and CKEditor.
We explored different ways of configuring the editor using various @Input and @Output properties and explored how to retrieve data correctly for optimized performance.
In the last part, we explored how to customize the editor’s look and feel by overriding the default values of CSS variables or by assigning CSS rules using class names.
Helpful Links
To learn more about the CKEditor installation options, check the documentation for detailed guides and configuration options:
Start building with CKEditor today! Register for a free trial, and integrate powerful rich text into your Angular project!